
How to Relieve Upper Back Pain Fast Without Stretching.
When looking to reduce upper back pain, you'll come across a few common strategies.
These include upper back stretches and upper back exercises.
The problem is, I bet you've already tried multiple mid back stretches and exercises. You may have noticed that they provide only minor, short term relief. And, they leave people back on the internet searching for the next promising, quick fix.
Why are these stretches and exercises different?
For starters, I am going to advocate against stretching. And regarding the exercises, the most important exercises to be aware of are the ones you SHOULD not do.
Why should you read this blog and take on the advice? Because the author owns a pain management clinic in Brisbane, Australia. This specific pain clinic corrects chronic back pain faster and more effectively than any other method or clinic. More important, this clinic consistently shares its incredible results online.
We believe transparency and results should be driving our industry. You can skip ahead to see some of our upper back pain case studies.
Stretches for mid back pain
The mid back is a common place for people to experience pain. This is partially because the movements of the spine greatly affect this region. Physical therapists commonly prescribe stretches for mid to upper back.
The issue is, stretching is not a viable long term solution. Most people do not move their spine correctly. We often see people who are too flexible or flaccid, and others who are too immobile and rigid.
To add to this, most people have parts of their spine that are too flexible and other parts that are too rigid. This causes a complicated situation in which tight areas begin to pull of looser areas, often resulting in pain.
When you add stretching to this mix, you create more of the original problem. Instability and imbalances in the spines structure and movement patterns.
Let's address and review the top 3 most commonly suggested stretches for upper back pain. Then, we will discuss effective alternatives to these upper back strain stretches.
1. Seated twist

Image from experiencelife.lifetime.life
To perform the seated twist, according to Medical News Today:
Sit in a chair with legs crossed or straight out in front while pulling the shoulder blades together and down.
Place the right hand on the outside of the left knee and place the left hand behind the back to provide support. Slowly twist to the left side.
Hold for 20-30 seconds and then return to center.
Repeat on the other side.
Here is what we think about the seated twist:
Inadequate Core Engagement: Having core stability during movements is an absolute must. The seated twist may not sufficiently engage the core muscles. In fact, it encourages a passive stretch on the core.
This leads to reliance on the spine and upper back muscles to maintain posture and twist. This can strain the upper back, especially if the core is weak or not engaged properly.
Excessive Rotation of the Spine: Twisting movements, when done forcefully, flaccidly or repetitively, put significant stress on the body. This includes increased stress on the spinal discs and joints.
Functional Patterns promotes movements that are more aligned with natural movements and mechanics. This reduces undue stress on any particular joint or muscle group. The seated twist can over-rotate the spine, potentially exacerbating any existing issues or causing new ones.
Considering most people can rotate much further in one direction, the seated twist can exacerbate these asymmetries.
Poor Shoulder Mechanics: Pulling the shoulder blades together and down can lead to tension in the upper back and neck. Additionally, placing one hand behind the back can cause the shoulder to rotate internally. This is not ideal for those with shoulder issues or upper back tightness related to poor posture.
Compensation Patterns: People with upper back pain often develop compensation patterns, using other muscles to avoid pain. This can lead to imbalances and further pain. The seated twist might reinforce these compensation patterns.
Static Position and Strain: Holding the twist for 20-30 seconds can cause static strain on the muscles of the upper back. Functional patterns methodology usually promotes dynamic movements that mimic natural human activities, reducing the risk of overloading specific muscles.
Common Sense Considerations: Any exercise that involves twisting the spine and holding static positions can aggravate upper back pain. Everybody is different and has different root causes that they must address.
2. Child’s Pose

Child’s Pose is a simple yoga pose. It allows the spine to elongate passively while the person rests over their knees. Child's Pose is one of the most common upper spine stretches
To perform Child’s Pose:
Start in a kneeling position.
Spread the knees apart to a comfortable point. Then fold the body forwards, bringing the chest down towards the knees.
If possible, bring the forehead to the floor, with the arms stretched out in front. The hands should gently rest on the floor, keeping the arms straight.
Hold this position for 5–10 breaths.
Use the hands to gently return to an upright position.
Here is what we think about the child's pose
Shoulder Range and Lack of Lat Connectivity: The arms stretch out in front and the shoulders are at the end of their range. They do so without engaging the latissimus dorsi (lat) muscles. This lack of lat connectivity means the shoulders and upper back bear the brunt of the stretch. This can increase strain and discomfort in the upper back area.
Full Hip and Knee Flexion: The position involves full hip flexion and full knee flexion, which might not be suitable for everyone. These extreme positions can put additional pressure on the spine and surrounding muscles. Particularly if an individual has tight hip flexors or knee issues.
Passive Nature and Lack of Functional Movement: Child’s Pose is a passive stretch that doesn't replicate functional activities like running or throwing. Functional patterns methodology emphasises movements that mirror real-life activities and promote overall functional fitness. The passive nature of Child’s Pose can lead to relaxation of the muscles. It does so without addressing underlying asymmetries or movement dysfunctions.
Asymmetrical Movement Patterns: The real reason for upper back pain is often due to uneven or faulty movement patterns. Child’s Pose does not correct these patterns and might even reinforce them if not performed with mindful adjustments. For example, an individual might unknowingly favour one side over the other, making imbalances worse.
Lack of Core Engagement: The pose doesn’t engage the core muscles actively, which are crucial for stabilising the spine. Without core engagement, there’s a higher likelihood of placing undue stress on the upper back muscles and spine. This leads to worsening pain.
3. Cat-Cow Pose

Shutterstock
Like Child’s Pose, Cat-Cow Pose is another gentle yoga exercise. It helps stretch and loosen the shoulders and the muscles that run the length of the spine.
To perform Cat-Cow Pose:
Start on hands and knees, with the knees below the hips and the wrists below the shoulders. The spine should be in a neutral position.
Breathe in, let the stomach drop toward the ground, and stick the buttocks out. Lift the head and shoulders, then push the chest out and look forward.
Breathe out and arch the back upward like a cat. Tilt the pelvis toward the ribs, drawing the shoulder blades away from each other and the belly away from the ground. Let the head drop toward the floor.
Shift between these for around 30–60 seconds
Here is what we think about the cat-cow post:
Flaccid Spinal Stretching: This exercise involves alternating between spinal extension (Cow Pose) and flexion (Cat Pose). While it may feel good initially, it can lead to flaccid spinal stretching. This passive stretching doesn’t promote active engagement of the muscles surrounding the spine. This is crucial for stability and support.
Poor Core Engagement: In many cases, this exercise does not adequately engage the core muscles. Proper core engagement is essential for supporting the spine and maintaining overall posture. Without active core engagement, the spine can become unstable, contributing to or exacerbating upper back pain.
Does Not Address Underlying Dysfunctions and Asymmetries: This exercise does not specifically target or correct underlying dysfunctions and asymmetries in movement patterns. Functional patterns methodology emphasizes addressing these imbalances to promote optimal movement and reduce pain. Simply moving through Cow and Cat poses may not correct these issues and could potentially reinforce them.
Contributes to Instability and Lack of Integration: These stretches can contribute to instability and a lack of integration in the muscles surrounding the spine. This is a significant concern because most upper back pain stems from a lack of stability and muscular integration. The exercise does not strengthen the muscles needed to support the spine effectively.
Does Not Mimic Functional Human Movements: The exercise does not replicate functional human movements such as sprinting or throwing. Functional movements involve coordinated actions of multiple muscle groups and joints, promoting overall stability and strength. Cow and Cat poses are inherently static. They do not train the body in the dynamic, integrated way that functional activities do.
Stretches for sore upper back fail to address the true reason for the pain in the first place.
What Should You Do Instead To Quickly Reduce Upper Back Pain Without Negative Consequences?
You may be surprised to hear that the most effective way to stop upper back pain is by addressing 3 completely different areas on your body.
Here are the top 3 most important release work areas for upper back pain. You will need a small hard ball such as an MFR (Myo-fascial release) ball, a lacrosse ball or a softball.
1. Pecs (Pectoral Muscles)
Explanation:
The pectoral muscles pull the shoulders into internal rotation, contributing to kyphosis (rounded upper back). This positioning stretches the upper back muscles constantly, leading to pain and discomfort.
How To:
Position: Lie on your stomach with a small, hard ball placed under one of your pectoral muscles.
Locate: Move the ball around the chest area to find tight or tender spots.
Pressure: Apply gentle pressure by relaxing your body weight onto the ball.
Movement: Slowly move your arm in small circles or up and down to increase the release.
Duration: Spend 1-2 minutes on each side, focusing on breathing deeply and relaxing the muscle.
2. Upper Abdominals
Explanation:
The upper abdominal muscles can pull the spine into kyphosis and increase spinal flexion. This lack of extension through movements can lead to upper back pain.
NOTE: Be extremely careful when releasing your abs. Stay away from the centre and trace under your rib line with the ball starting from a few centimetres from the middle.
How To:
Position: Lie on your stomach and place the ball under your upper abdominal area. The bottom of your ribs are a good guide.
Locate: Roll slightly to find a spot of tension or discomfort in the upper abs.
Pressure: Apply gentle pressure by relaxing your upper body onto the ball. Stay still on the area for up to 2 minutes as the ball works to release the muscle.
Movement: Perform extremely slow and small circular or side-to-side movements to massage the area.
Duration: Spend 1-2 minutes, ensuring to breathe deeply and keep the pressure tolerable.
3. Quads (Quadriceps)
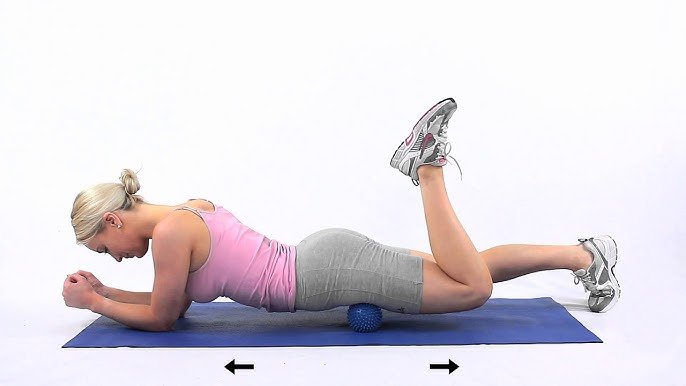
Credit: Rehab My Patient
Explanation:
The quads are part of the front chain that can pull down on the core and pec muscles, affecting posture. Sometimes, targeting muscles further down the chain, like the quads, can have a significant impact on the spine and overall posture.
How To:
Position: Lie face down with the ball under one of your quadriceps.
Locate: Roll the ball along the quad to find tight or tender spots.
Pressure: Apply gentle pressure by allowing your body weight to press into the ball.
Movement: Bend and straighten your knee or roll the ball up and down the length of your quad to enhance the release.
Duration: Spend 1-2 minutes on each quad, focusing on slow, controlled movements and deep breathing.
General Tips for MFR with a Small, Hard Ball:
Start Gently: Begin with light pressure to avoid unnecessary pain or injury. Increase pressure as you become more comfortable.
Stay Relaxed: Focus on deep breathing and staying as relaxed as possible to enhance the release.
Hydration: Drink plenty of water before and after MFR sessions to help flush out any released toxins and keep muscles hydrated.
Consistency: Incorporate these techniques into your routine regularly for the best results.